What this rig is all about:
Trout are generally freshwater fish that live in clear rivers, streams and lakes. There are many different types of trout such as rainbow trout, brook trout, bull trout, and more. Trout are some of the healthiest fish to eat, taste decent, and contain a lot of omega 3 fatty acids. Read on to learn about a very effective rig to catch all types small to medium sized (1-5 pounds) trout with.
Here is a list of materials/items that you will need to make this rig:
Follow the links for pricing info on Amazon.
– 1 bobber
– scissors/nail clipper
– A set of pliers to pinch the split shot with
Recommended Rod and Reel for Trout Fishing:
How to use this rig:
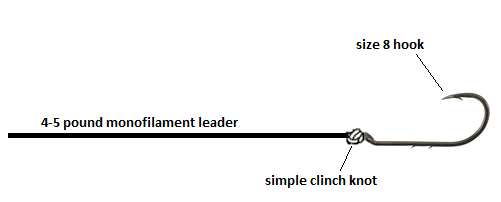
This rig is really simple. It’s basically a bobber, split shot, and worm rig. The first mistake anglers have when constructing a similar rig is that they use too large of equipment. This rig features a small bobber and a really small (size 8) hook. Trout have pretty small mouths so a size 8 hook is ideal. Using huge hooks and lures to fish for trout is usually not the best way to maximize your chances of catching them.
This next tip is quite important and may be the difference between landing the fish and not landing it. You want to have enough split shot sinkers attached to the line such that the bobber is just barely above the water. I’ve specified you need 2 split shots but really you need as many as necessary to keep the bobber just barely floating. If you need more than 3, just use a smaller bobber. The reason for this is when the trout grabs the worm and takes it under, you don’t want the fish to feel any extra “pull” and have them let go. You want them to unsuspecting. Use this technique to make the rig stealthy.
Bait that works great and one that I use over and over again are just worms that are about 3 inches long.
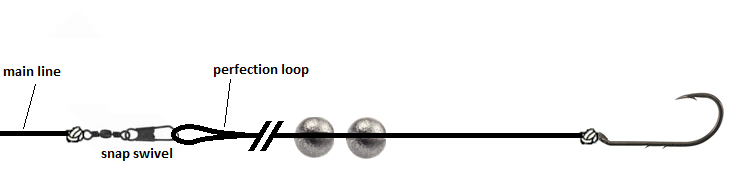
Also, this guide shows a setup with a “leader” section but you don’t necessary need a tougher or even different line than what your main line is. The sole purpose for this section is for ease of switching out rigs. You can just as easily make this rig with your main line by omitting the snap swivel.
Setup guide:
-
- The first step to constructing this trout-catching rig is to cut out about 4 feet length of 6 pound monofilament leader line (excluding the scope needed for tying a couple of knots). Tie your size 8 hook to one of the ends of the line using whatever knot tying technique works for you. I specifically use a clinch knot. Check out a tutorial here to do that:
- Proceed to clamp the 2 split shot sinkers onto the line about 1-2 feet away from the hook depending on the depth you are fishing at. Use the pliers to do so to ensure they are fixed in position.
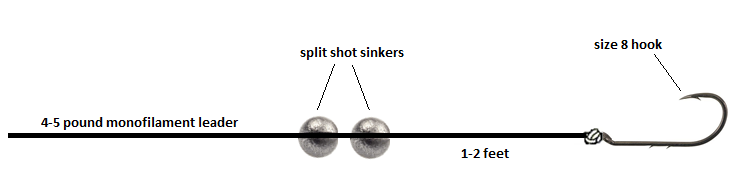
Place the sinkers about 1 inch apart.
-
- Tie the snap swivel onto your main line using whatever knot you like. Again, I recommend the clinch knot. Then, attach the leader section with the hook to your snap swivel. I like to create a small perfection loop to attach the leader section to the snap swivel.
- Step 4 is to attach the bobber to the leader section about 1 foot away from the swivel. Check out the following YouTube video to attach a bobber to your line.
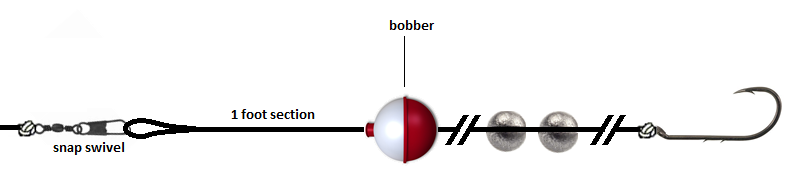
- The last step is to attach the live worm bait to the hook.
 If you really want a great working bait, try the PowerBait Natural Scent Trout Bait
. This almost never fails however, there is a drawback. Using a gob of this stuff tends to gut hook the fish so it isn’t very sporting if you plan on catching and releasing. If you are harvesting them, then this is a bit more ethical.
This is a simple setup but it works great! Go out there and test it out! Let me know if this rig is working for you and rate this rig at the top of this article.