What this rig is all about:
This rig will help you catch keeper-sized California halibut while trolling from a small boat or kayak. It has been proven to catch halibut in waters anywhere from 10 to 30 feet deep. Continue reading to learn how you can rig it up and some tips on how to use it. This rig uses a small jerk bait with good action, a spinning flasher commonly used for salmon, and a 4 oz sinker all combined with a 3 way swivel.
Here is a list of materials/items that you will need to make this rig:
- 30 pound braid for the main line
- 25-30 pound monofilament line for leader
- Spinning fish flash
- Rapala RipStop Jerk Bait
- 3 way swivel
- 4 ounce sinker
- Ball bearing swivel
- Snap swivel
Recommended rod and reel:
- KastKing Crixus Fishing Rods, Casting Rod 7ft-Medium Heavy – Fast-2pcs
- Shimano Spheros 5000 SW heavy duty saltwater fishingreel, SP5000SW
How to use this rig:
If you’re trolling for halibut or any fish for that matter, it’s important to check your bait every once in a while to make sure that the action of the bait is still natural and that there’s not any seaweed, grass, or anything else that will hinder the action.
Your trolling speed for this rig should be such that the sinker just barely bounces on the bottom. The slower you go, the lower the sinker will be in the water column. As long as the sinker is near the bottom, then you know your bait is in the correct location.
The jerk bait can also be replaced by herring, anchovies, cut salmon, or even octopus hooked like cut bait with a 1/0 to 3/0 hook. Play around with the bait for the best chances since your probability of landing a halibut depends on many variables like water depth, temperature, etc. It’s been mentioned that changes in water depth may be where halibut like to hunt.
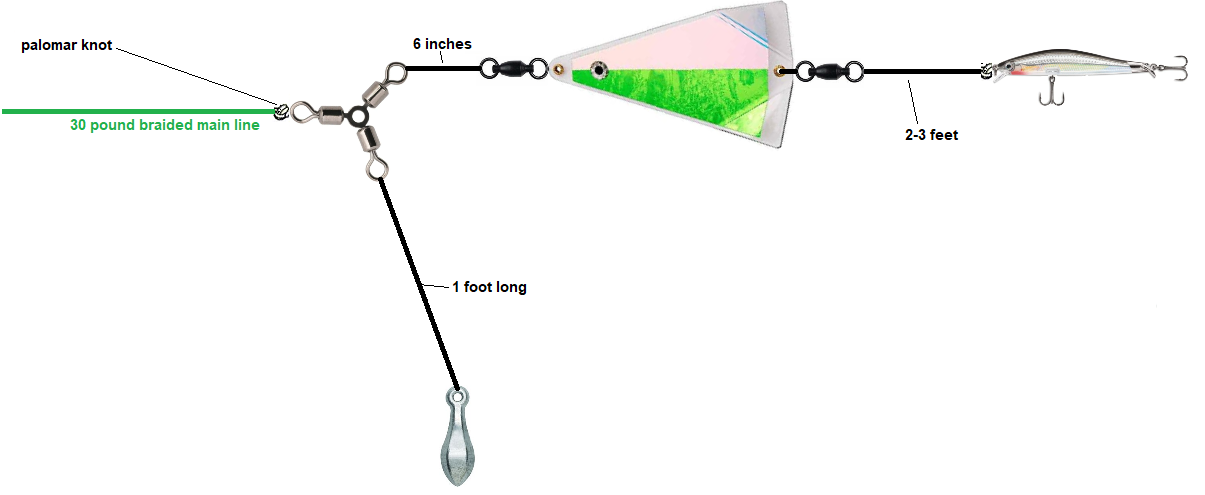
Setup guide:
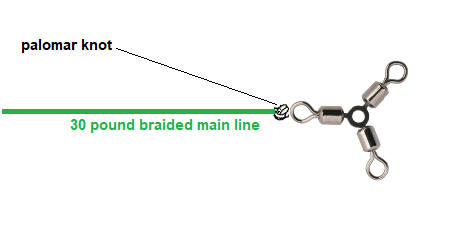
- Tie your 30 pound braid main line to the 3 way swivel. You can use any knot that makes a secure attachment but I recommend a palomar knot.
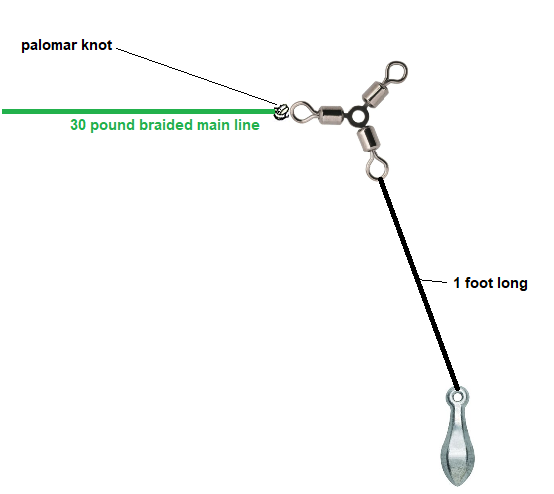
- Tie the 4 ounce sinker to one of the eyes of the barrel swivel using the monofilament line. The length of the line should be about 1 foot long. Remember, halibut are very low in the water column and are always close to the bottom. Again the knot can be any knot that you like.
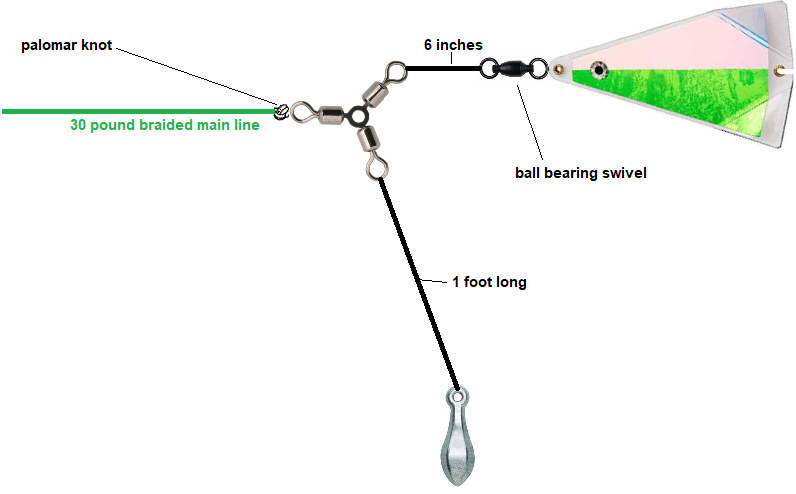
- Connect the last swivel on the 3 way swivel to the ball bearing swivel using about 6 inches of monofilament line. The ball bearing swivel should connect to the spinning fish flash and sometimes, when you buy the fish flash, it will come with the swivel as well. If it doesn’t, make sure you have a ball bearing swivel so that you don’t tangle up your line. Attach the other end of the ball bearing swivel to the spinning fish flash like so:
- Finally connect another 2-3 feet of monofilament line to another ball bearing swivel that’s attached to the flasher. Attach the other end to the jerk bait. You can optionally attach a snap swivel at the other end of the mono line in case you want quickly switch out baits. Again, palomar knots are suggested. The final setup should look like this:
There’s a little bit of setup involved but this rig works very well! Go out there and test it out! Let me know if this rig is working for you and rate it at the top of this article.