What this rig is all about:
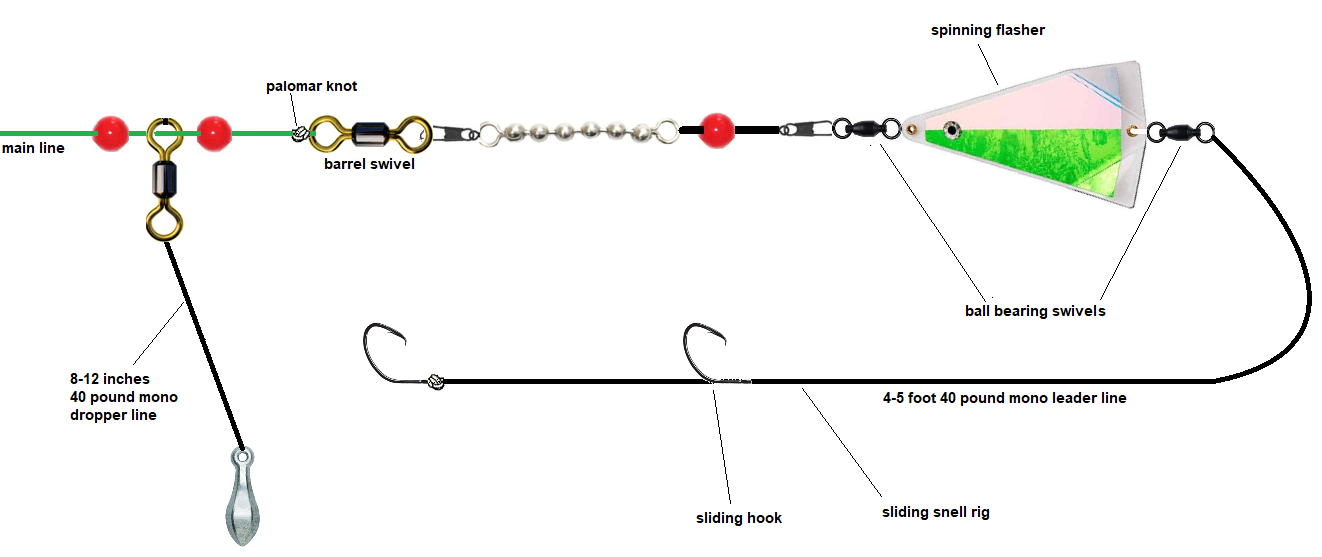
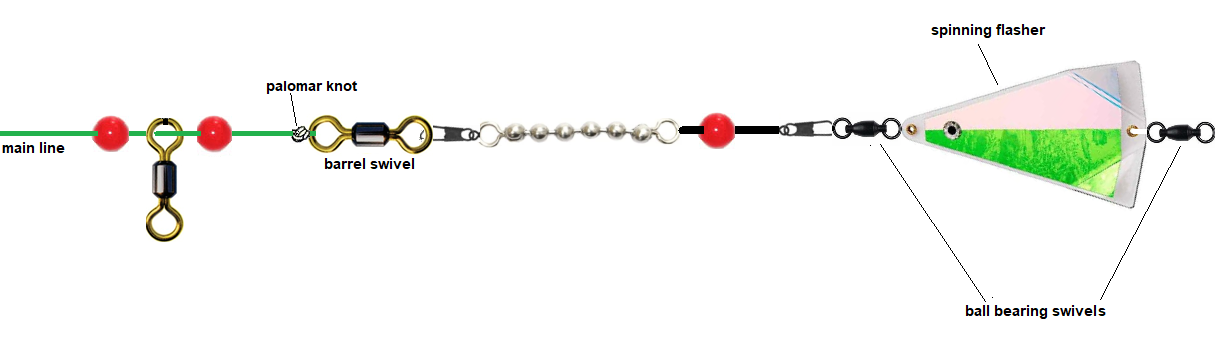
This rig will help you catch keeper-sized California and Pacific Northwestern salmon. Keep in mind this is an advanced rig and can take a good amount of time to set up. Also, all the different aspects of this rig are designed to minimize the chances of snags and/or tangles so that you can maximize the chance of landing a keeper salmon without having a bunch of downtime. Read on to learn more. The final rig looks like this:
Here is a list of materials/items that you will need to make this rig:
Links include pricing info on Amazon and are the suggested products for this rig.
- 50-65 pound braid for the main line
- 4-5 foot, 40 pound monofilament leader line
- Beads (to prevent seaweed build up and protect knots)
- Trolling Bumper Rig (with 200 pound test mono for stiffness and bead chain)
- Ball bearing swivels
- Barrel swivels
- Flasher
- 2 Mustad UltraPoint Demon 3/0 Hooks
- 6-20 oz is commonly used (depending on depth and current)
Recommended rod and reel:
- 10-12 foot medium heavy action 15-30 lb rod
- Bait caster reel with a line counter
Tips on how to use this rig:
This rig does not require a down rigger and can effectively fish up to approximately 30 feet of water.
The length of the dropper line that is attached to the sinker should be roughly 8-12 inches depending on conditions. You want to make sure the rig is as close to the bottom of the water as possible without snagging or tangling.
All the gear, from the 6 bulb bead chain to the 200 pound mono bumper to the ball bearing swivels, are for protecting your rig and to prevent tangles where you can potentially lose the rig from snags. If it does get tangled in seaweed, you can usually just strip the rig right off since it uses some heavy duty components.
You can apply anchovy or herring as your bait. This is a very typical yet effective bait for salmon. Just make sure to rig the bait up so that there is no spin on the bait.
Make sure the hooks are correct for the location you are fishing in. Some states require by law that the hooks be barbless. Please check with your local fish and wildlife department for the latest regulations.
Your trolling speed for this rig should be such that the sinker just barely bounces on the bottom. The slower you go, the lower the sinker will be in the water column. As long as the sinker is near the bottom, then you know your bait is in the correct location.
Setup guide:
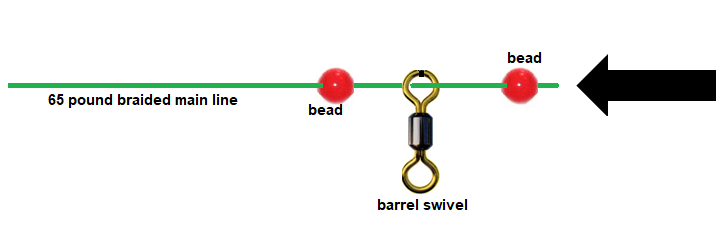
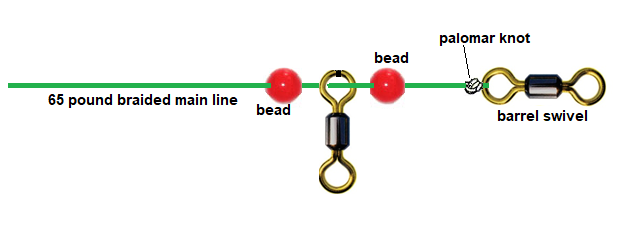
- First, string onto your main braided line a bead, then a barrel swivel, and then another bead. The barrel swivel is for your dropper line and sinker. The beads are to allow for some protection against the seaweed getting caught as well as protecting the knot you’re going to make with another barrel swivel that will connect with the trolling bumper.
- With the beads and barrel swivel fed through the main line, use your favorite knot to tie the other barrel swivel on the free end. I would recommend a palomar knot. You can check out how to tie one with this video:
- Now, for the trolling bumper. This is the portion of the rig that connects your main line to the flasher. Typically, it has a 6 bead chain followed by 150-200 pound monofilament. You can make these yourself but it’s a bit of work since you’ll need to crimp the line. This tutorial doesn’t go through making the trolling bumper. You can just buy one here.
If you do want to make it yourself, there are many YouTube videos that guide you through it.
Continuing with the rig, connect the trolling bumper rig to the barrel swivel using the duo lock snap closest to the 6 bead chain like so:

- Now, connect the flasher to the other end of the trolling bumper with a ball bearing swivel. Take note of the direction of the ball bearing swivel. You want to position it so that seaweed or any other “stuff” doesn’t get collected into the bearing. Usually, when you buy the flasher, it will come with ball bearing swivels. If not, you will need to buy some.
- This step is to construct the leader with the 40 pound mono line. The specific rig for the leader calls for 2 3/0 hooks with a sliding snell rig. You can check out how to make the rig with this video:
The point of the sliding hook is to accommodate different sized bait fish like anchovy or herring when you’re experimenting on what works. Also, this allows you to modify the spin on the bait using the 2 hooks. Make sure that the leader length is 4-5 feet from the last hook to the attachment point to the flasher.
- It’s time to connect the leader rig with the flasher using another ball bearing swivel. You can connect it directly to the ball bearing swivel or you can attach a snap swivel to the ball bearing swivel to give you some modularity with your leader setup.

- Finally, use the 40 pound mono line to construct your dropper. This dropper line length should be about 8-12 inches. Use your favorite knot to tie onto the sinker and then subsequently to the sliding barrel swivel on the main line. The finished trolling salmon rig should look like this:
There’s a little bit of setup involved but this rig works very well! Go out there and test it out! Let me know if this rig is working for you and rate it at the top of this article.
Don’t forget to check out the Pro Fishing Rigs store for more cool stuff!