What this flicker flounder rig is all about:
Flounder are a type of fish that has a flat shape resembling an oval-ish stingray and live at the bottom of the ocean. They typically feed on the bottom and are well adapted for this type of hunting as they hide in the sandy bottom. Using this article, you will learn how to make what is called a “flicker rig” to maximize your chances of catching a flounder. It’s basically a modified version of the standard fish-finder rig.
Here is a list of materials/items that you will need to make this rig:
Follow the links for pricing info on Amazon.
– Light monofilament for the leader line (I recommend this line)
– 1 Eggor bullet sinker
(0.5 oz)
– 1 bright-colored foam or cork float
– scissors/nail clipper to cut the line with
– 1 small chrome or brass spinner blade
– 1 hook (I recommend 1/0 Kahle)
Optional Recommended Equipment:
– Penn Battle II Spinning Reel
– Penn Squadron 410 Inshore Spinning Rod, 7-Feet/Medium
How to use this rig:
This rig works in all depths of water. Flicker rigs also work for other fish like walleye so the key for catching flounder here is the bait. The Berkley gulp artificial bait is a popular one or you can use a live mud minnow. If none of those options are available, use a live shrimp.
You don’t need to work the bait if it is live but you do need to make sure it is drifting because flounder are more or less stationary. They wait for prey to cross their path. If you are using artificial bait, try reeling periodically with this rig feeling the line all the way in.
Setup guide:
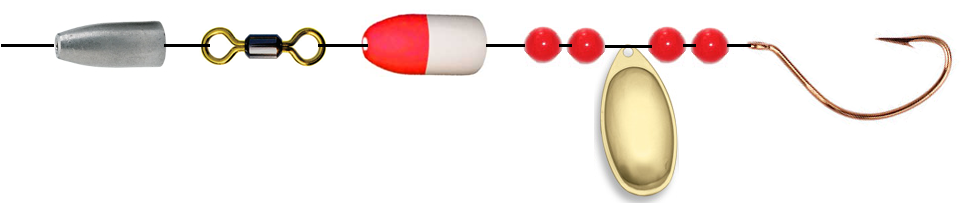
- Slide the sinker onto your main fishing line such that it is free to move.
- Attach the end of your main line with the sinker on to the barrel swivel using whatever knotting technique works for you. I recommend this one:
- Cut a 2-foot (excluding scope for two knots) section of the monofilament leader line. Attach one end to the swivel.
- Slide in the following items in this order to the leader: First, the float (you can use “stoppers
” to fix the float position along the line), 2 beads, the spinner blade, 2 beads.
- The last step is to tie the hook on with a sturdy knot. If you are using artificial bait, insert the Berkley gulp bait into the hook. Take the bait at the head and pierce it with the hook. Continue pushing the bait into the hook, all the while aligned with the hook, until you can’t anymore. Then, simply push the hook out of the shrimp where it’s at. If you are using live bait, hook the bait by the nose before you cast.
That’s it in 5 simple steps. Let me (and the fishing community) know if this rig is working for you and rate this rig at the top of this article. The finished setup is depicted in the diagram below:
If you don’t like to make your own rigs, you can buy a pre-made, stock flicker rig here.

Check out another flounder rig here.