What this rig is all about:
This rig targets walleye fish when the fish are closer to the bottom of the water column. This rig is a walleye lindy rig which utilizes a leech as the live bait option on the hook. You can use other live bait as well like nightcrawlers, big minnows, etc. Follow this guide to maximize your chances at landing those keeper walleyes.
Here is a list of materials/items that you will need to make this rig:
Links include pricing info on Amazon and are the suggested products for this rig.
- 12 pound braid (low viz)
- 10 pound fluorocarbon leader
- Bead
- Barrel swivel
- Number 2 octopus hook
- Bullet sinker (1/4 to 1/2 ounce, depending on conditions)
Recommended rod and reel (buy on Amazon with the links below):
PENN Prevail II Inshore Spinning Fishing Rod, Prevail II (New Model), 7′ – Light – 1pc


Setup guide:
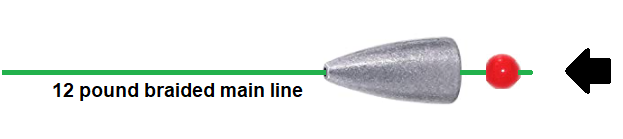
- Feed in the bullet sinker and a bead through the main braided line. The bead is there to protect the knot you will make with your barrel swivel. The bullet shape for the sinker allows you to better traverse rocky bottoms and not get snagged.
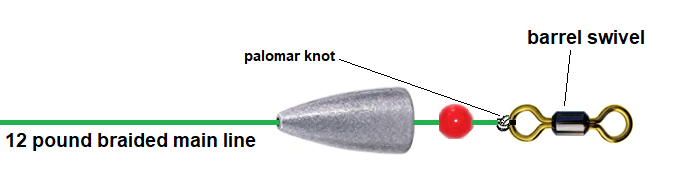
- Tie your 12 pound braid main line to the barrel swivel. You can use any knot you like to secure the connection but I would suggest a palomar knot. Check out this video to tie a palomar knot:
- Cut out enough 10 pound fluorocarbon line to have a 5 foot leader (excluding scope for the knots that you will tie). Tie one end to a number 2 sized hook.
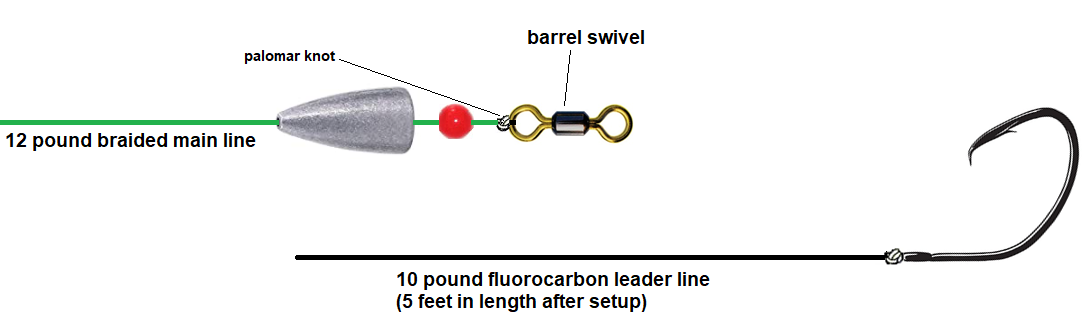
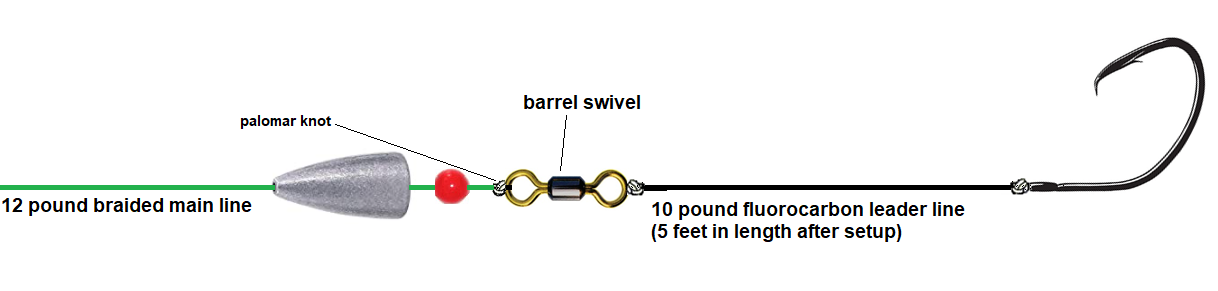
- Finally, tie the other end to the barrel swivel on the main line. The final rig should look like this:
How to use this rig:
The weight you want to use is highly dependent on the current and depth that you are trying to target your walleye at. The stronger the current and the deeper the depth, the larger your bullet sinker should be. Typically, for summer lindy rigging, anywhere from ¼ ounce to ½ ounce should be adequate sinker weight for 20-30 feet of water.
The importance of the light rod is the tip of the rod should be sensitive so that when the walleye bites the bait, it doesn’t detect that it’s on the hook.
When fishing for walleye with the lindy rig, you want to drop your rig so that the weight is roughly 1 foot from the bottom. You don’t want to be dragging on the bottom but instead slightly above it. The fluoro leader sinks so the hook will be near the bottom as well. The braided main line allows you to feel the bottom terrain much better.
Keep in mind the angle your line makes with the water and how that relates to the depth at which you want to fish in. The angle is dependent on the speed of your trolling motor and the weight of your sinker. For example, a lighter sinker like a ¼ ounce may create a shallower angle with the water and you may have to let out much more line to reach the bottom. That is in contrast with a ½ ounce weight that basically drops straight down.
Leading up to the hook set, the way to work the lindy rig is the following. While you’re waiting for a bite, your bail should be open with your finger on the line just like how you would when you’re about to cast the rod. Once the fish bites the bait, let the fish run with it for 3-5 seconds while the line is free spooling. The fish should be taking some of the line. At that point, close the bail and reel in slightly until you feel a bit of weight. Then, use a sweeping motion, up and at an angle, to set the hook. Now, your walleye should be on.
When hooking the live bait, in this case, a leech, make sure you hook it directly in the middle (between the right and left sides of the leech) directly behind the sucker. This prevents the leech from spinning in the water and getting curled up into the hook. You want the presentation of the leech to be as “free ribbon-like” as possible.
I hope the tips and this setup guide helps you catch lots of walleye. Go out there and test it out! Let me know if this rig is working for you and rate it at the top of this article.
Don’t forget to check out the Pro Fishing Rigs store for more cool stuff!