What this rig is all about:
This tandem rig is perfect for fishing flounder. Flounder, also known as fluke or flatties, are pretty much all around the coasts in North America but generally along the eastern seaboard from Florida to Maine. Read on to find out how this tandem, two-hook rig can help you get really good at filleting flounder. 😉
Here is a list of materials/items that you will need to make this rig:
Links include pricing info on Amazon.
– 20 pound fluorocarbon for the leader line
– 2 buckhead jigs (1 3/4 oz, 1 3/8 oz)
– 2 white 4 inch swimming mullet (Berkley gulp)
– scissors/nail clipper
Optional Recommended Equipment:
– Penn Battle II Spinning Reel
– Penn Squadron 410 Inshore Spinning Rod, 7-Feet/Medium
How to use this rig:
This rig will work just fine just about anywhere in water around 20′ or less in depth. This one works well to about 30′ IF the current, drift, and wind all working together.
As far as how to work this setup, first drop it down to the bottom. When you feel the bottom, lift it up about 4 – 6″ and bounce it, allowing it to hit the bottom every few moments or so to make sure you are following the bottom contour.
You don’t want to drag it along because you will hang it constantly on anything down there, plus real bait fish don’t drag themselves on the bottom. Flounder are sitting on the bottom looking up. As long as it is within sight of them they will come up and hit it. As a result, the top jig will catch a lot of flounder as well.
The bottom jig gets their attention and they come up, then get distracted by the top one and nail it instead. When you feel it hit, just lift is about 6″ and set the hook. A good medium action rod and braided line are a must-have to feel what is going on.
This setup is also pretty versatile as you can use it for surf fishing as well granted the conditions aren’t too rough. In fact, with currents pulling the rig along, it should help you cover a lot of bottom area pretty quickly.
Flounder are sight feeders mostly. Some fisherman think they may get tackle shy so the fluorocarbon line’s purpose is to be as stealthy as possible.
The snap swivel on the end of the main line will make switching out rigs fast when you break one as it is possible for this line to get snagged.
Spec rigs will work too of course but not for deeper water and they are harder to keep vertical. A heavier jig on the bottom works well in deeper water. This rig works awesome and will out-fish the usual rigs big time.
Setup guide:
- The first step to cut out a length of the fluorocarbon line about a whole arm’s length (5-6 feet).
- Pick a point between the two ends and tie a loop knot such that the knot is about 12 inches from one of the ends of the line. This end is where the lighter jig will be attached to.

Check out this video to learn how you can make a loop knot. - Tie the jigs to the line with one at each end. The heavier jig will be at the bottom and the lighter jig will be closer to the knot. You can tie the jigs onto the end using a couple of palomar knots.

Check out this video to learn how to tie a palomar knot.
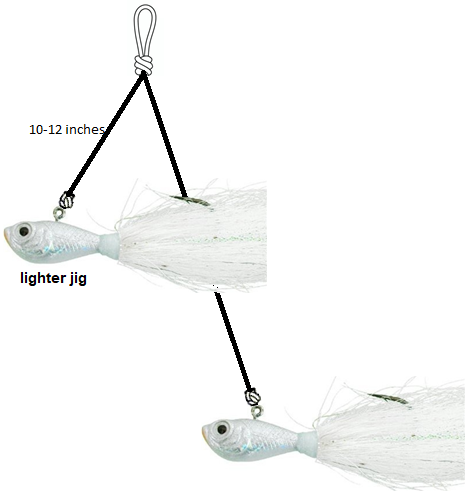
- Step 4 is to thread two of the white Berkley Gulp swimming mullet onto each of the jigs.
- Tie your snap swivel onto your main line and connect this rig to it using the loop knot. The finished setup is shown in the picture below.

It’s a relatively simple rig but it works great! Go out there and test it out! Let me know if this rig is working for you and rate it at the top of this article.